Showing posts with label Fairies. Show all posts

Monday, 5 August 2019

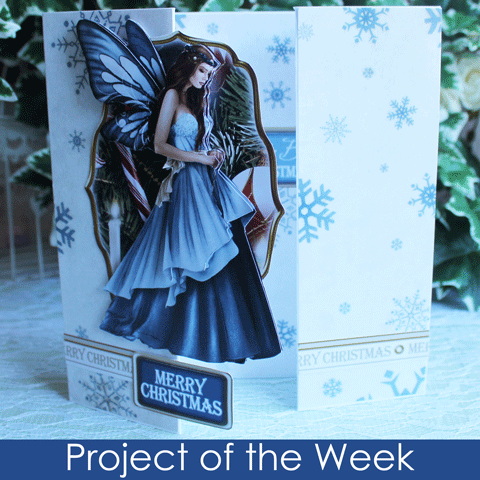
Christmas Fairies - Merry Christmas - Project of the Week

Materials:
Decoupage Sheet 
Backing Papers 
2 A5 White Card Blanks 
Ribbon Strip 
Glitter
Equipment:
Paper Trimmer 
Bone Folder 
Wet Craft Glue 
Foam Pads 
Quickie Glue Pen
What You Need to Do:
1. Using one of the A5 card blanks, fold back the front of the card. Then rpeat the Using the DL card cover the front of the card using your chosen backing paper and double sided tape or wet glue.
2. From your decoupage sheet cut out all your layers and layer up your image using foam pads or silicone glue. If using silicone glue, make sure you leave your work to dry for at least an hour.
3. Fix your decoupage to the centre of the card using foam pads.
4. Then add a sentiment to the bottom of the card fixing bottom centre of the card.
5. To give your fairy that magic touch, using a quickie glue pen add glitter highlights around the details of the wings. 

Tuesday, 25 June 2019

Summer Fairies - Just for You


Materials:
A4 White Card
Design Sheet
Backing Papers
Magic Dust Glitters 
Gems
Blue Distress Ink


Equipment:
Scoreboard
Bone Folder
Glue or Double Sided Tape
Quickie Glue Pen
Scissors
Paper Trimmer


What You Need to Do:
1) Using the card landscape, score and fold the A4 card 9.5cm in from the left hand side. 

2) Cover the front with your chosen backing paper. 

3) Rub distress ink around the edges to give a more vintage look. 

4) Cut out a ribbon strip and fix to the side panel at angles as shown using double sided tape or wet glue. 

5) Cut out your topper and fix to the left of the card using foam pads. 

6) Cut out a sentiment and fix to the top right hand side using foam pads. 

7) Using the magic dust glitter and a quickie glue pen add glitter hightlights along the fairy wings. 

8) Finish by adding gems.

Summer Fairies - All My Love


Materials:
1 A4 White Card 
Mini Easel Sheet 
Gems/Glitter 
Embellishments


Equipment:
Scissors 
Trimmer 
Double sided tape 
Foam Pads/Silicone Glue 
Score Board 
Bone Folder 
Quickie Glue Pen


What You Need to Do:
1) Print out all your elements from your free cd. Print all on paper, and back your main topper and sentiment onto card.
2) Cut your card to measure 14cm x 27cm and fold in half. Then fold the top layer in half to make an easel card.
3) Cover the front with the backing paper that looks like its divided and rescore the fold line.
4) Attach the other backing paper to the inside back.
5) Attach your topper to the front of your card below the sore line as shown.
6) Cut out a sentiment onto card and attach to the inside back using foam pads to act as a stopper or cut out and make up the bow and use that as a stopper.
7) Add extra embellishments, gems and glitter to finish.

Thursday, 6 December 2018

Autumn Fairies - Lantern - Porject of the Week


Materials
Lantern Sheet
Lantern Toppers
Gems/Embellishments
Glitter


Equipment
Trimmer/craft knife
Scissors
Strong Double sided tape
Score board
Bone folder
Foam pads/silicon glue


What You Need to Do:
1) Cut out the two lantern panels and fix together using double sided tape or glue, but do not make the lantern totally up until all your toppers are fixed in each of the windows.
2) Cut out and glue the lantern toppers into your lantern windows as shown.
3) Cut out the ribbon strips and cross them over as shown to make a lantern holder.
4) Add sentiments with foam pads to give dimension at the bottom of lantern panels.

5) Finish off with glitter highlights and gems.

Tuesday, 23 October 2018

Autumn Fairies - There's Magic All Around - Project of the Week

Materials:
A4 White Card
Design Sheet
Backing Paper
Fairy Dust glitters


Equipment:
Scoreboard
Bone folder
Glue or double sided tape
Quickie Glue Pen 
Scissors
Paper trimmer


What You Need to Do:
1) Score and fold the A4 card in half to make an A5 card blank.
2) Cover the front of the card using your chosen backing paper, fixing in place using double sided tape or glue.
3) Cut out a ribbon strip and fix along the top and bottom of the card as shown.
4) Cut out your chosen fairy topper from your design sheet.
5) Glitter your fairy using the Fairy Dust glitters and a quickie glue pen.
6) Fix your topper to the front of the card using double sided tape or glue.

7) Cut out a sentiment and attach to the bottom left hand side with foam pads.
8) Finish by adding self adhesive gems.

Wednesday, 17 October 2018

Christmas Fairies - Best Wishes - Project of the Week


Materials
Decoupage Sheet 
Backing Papers 
DL White Card 
Glitter


Equipment
Paper Trimmer 
Bone folder 
Wet Craft Glue 
Foam Pads 
Quickie Glue Pen


What You Need to Do:
1) Using the DL card cover the front of the card using your chosen backing paper and double sided tape or wet glue. 
2) From your decoupage sheet cut out all your layers and layer up your image using foam pads or silicone glue. If using silicone glue, make sure you leave your work to dry for at least an hour. 
3) Fix your decoupage to the centre of the card using foam pads. 
4) Then add a sentiment to the bottom of the card fixing bottom centre of the card. 
5) To give your fairy that magic touch, using a quickie glue pen add glitter highlights around the details of the wings.

Tuesday, 27 March 2018

Project of the week: Spring Fairies

Fairy Middle Stepper Card
Materials
Template
A4 Card
Mirror Card
Gems/Glitter
Embellishments

1. Print off the Middle Stepper template. Transfer all the markings to the card. Cut on solid lines score on broken lines. Reinforce all the score lines with a bone folder. Gently push the card into shape.
2. Print off all the other elements. If your printer will take it print the design sheet directly onto card to give support otherwise back onto card now.
3. Cut a piece of backing paper to fit the main front section of the card. Use the card to draw around on the back of the paper then attach using double sided tape or glue.
4. Cut the ribbon strip from the design sheet. Attach to the side sections as shown using tape or glue.
5. Cut out your topper and matt onto mirror card. Cut out following the shape and then attach to the main section of the card using foam pads.
6. Matt a sentiment onto mirror card and cut out as above. Attach as shown using foam pads on the outsides of the sentiment, slightly pushing in the sides to give it a bowed effect.
7. Add glitter and gems to finish.