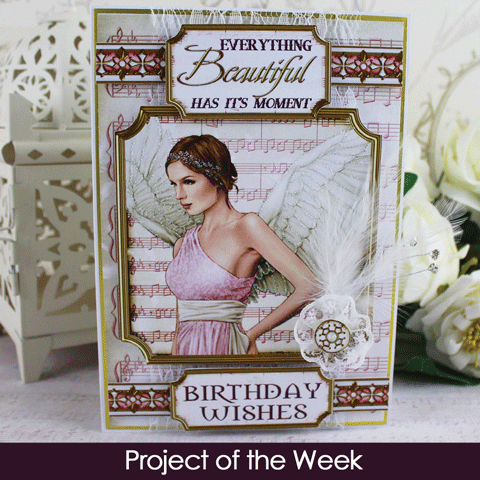
Showing posts with label Inspiration. Show all posts

Tuesday, 20 August 2019

Project of the Week: Flutterby Delights

Materials:
White Card 
Backing Paper 
Design Sheet 
Gems 
Stardust Glitter


Equipment:
Basic Craft Equipment

What You Need to Do:
1. Using your white card, cut it down to 35cm x 13cm. Then fold in half to create your card shape.

2. Cut out your backing paper and fix to the front of your card using double sided tape or craft glue.
3. Cut out a ribbon strip and fix to the left hand side of your card.
4. Cut out your topper and fix to the centre card using foam pads or silicone glue. If using silicone glue leave your work to one side to dry for at least an hour.
5. Cut out a sentiment and fix to the bottom right hand side with foam pads.
6. To finish add touches of glitter and gems to your card.

Monday, 5 August 2019

Christmas Fairies - Merry Christmas - Project of the Week

Materials:
Decoupage Sheet 
Backing Papers 
2 A5 White Card Blanks 
Ribbon Strip 
Glitter
Equipment:
Paper Trimmer 
Bone Folder 
Wet Craft Glue 
Foam Pads 
Quickie Glue Pen
What You Need to Do:
1. Using one of the A5 card blanks, fold back the front of the card. Then rpeat the Using the DL card cover the front of the card using your chosen backing paper and double sided tape or wet glue.
2. From your decoupage sheet cut out all your layers and layer up your image using foam pads or silicone glue. If using silicone glue, make sure you leave your work to dry for at least an hour.
3. Fix your decoupage to the centre of the card using foam pads.
4. Then add a sentiment to the bottom of the card fixing bottom centre of the card.
5. To give your fairy that magic touch, using a quickie glue pen add glitter highlights around the details of the wings. 

Tuesday, 25 June 2019

Summer Fairies - Just for You


Materials:
A4 White Card
Design Sheet
Backing Papers
Magic Dust Glitters 
Gems
Blue Distress Ink


Equipment:
Scoreboard
Bone Folder
Glue or Double Sided Tape
Quickie Glue Pen
Scissors
Paper Trimmer


What You Need to Do:
1) Using the card landscape, score and fold the A4 card 9.5cm in from the left hand side. 

2) Cover the front with your chosen backing paper. 

3) Rub distress ink around the edges to give a more vintage look. 

4) Cut out a ribbon strip and fix to the side panel at angles as shown using double sided tape or wet glue. 

5) Cut out your topper and fix to the left of the card using foam pads. 

6) Cut out a sentiment and fix to the top right hand side using foam pads. 

7) Using the magic dust glitter and a quickie glue pen add glitter hightlights along the fairy wings. 

8) Finish by adding gems.

Art Deco Decadent Christmas - Feather Glamour


Materials:
A4 White 
Card Topper 
Backing Papers 
White Feathers


Equipment:
Scoreboard 
Bone Folder 
Glue or Double Sided Tape 
Quickie Glue Pen 
Scissors 
Paper trimmer


What You Need to Do:
1) Cut down you card to 18.5cm x 29.7cm, then fold in half to create your card blank. Mark and score at 8cm and 11.5cm. Using a bone folder fold back the first score line and then forward the second score line. This will create your card shape. 
2) Cover the front and the inside back with backing paper using double sided tape or glue. 
3) Cut out the ribbon strip and fix to the right hand side as shown. 
4) Cut out your topper and sentiment, and back it with card to make it sturdier. 
5) Attach white feathers to the back of the topper, then fix the topper onto the front panel, using silicone glue, (make sure you leave your work to dry for at least an hour). 
6) Attach the sentiment on top of the topper using foam pads, allowing it to overhang as shown. 
7) Finish off adding glitter highlights and gems to the card.

Flutterby Delights - Happy Birthday


Materials:
Square card blank
Backing Papers 
Design sheet 
Stardust Glitter


Equipment:
Basic Craft Equipment

What You Need to Do:
1) Print out all your elements from the collection.
2) Using the backing paper, cover the front of the card using craft glue or double sided tape.
3) Cut out your topper and fix to the top left hand side as shown.
4) Cut out a matching ribbon strip and fix along the bottom of the card using double sided tape or craft glue.
5) Choose a sentiment and fix to the right hand side using foam pads.
6) Cut out extra embellishments and fix to the card as shown.
7) Add self adhesive gems to the centre of the flowers.
8) Finish the card by adding touches of glitter using a quickie glue.

Summer Fairies - All My Love


Materials:
1 A4 White Card 
Mini Easel Sheet 
Gems/Glitter 
Embellishments


Equipment:
Scissors 
Trimmer 
Double sided tape 
Foam Pads/Silicone Glue 
Score Board 
Bone Folder 
Quickie Glue Pen


What You Need to Do:
1) Print out all your elements from your free cd. Print all on paper, and back your main topper and sentiment onto card.
2) Cut your card to measure 14cm x 27cm and fold in half. Then fold the top layer in half to make an easel card.
3) Cover the front with the backing paper that looks like its divided and rescore the fold line.
4) Attach the other backing paper to the inside back.
5) Attach your topper to the front of your card below the sore line as shown.
6) Cut out a sentiment onto card and attach to the inside back using foam pads to act as a stopper or cut out and make up the bow and use that as a stopper.
7) Add extra embellishments, gems and glitter to finish.

Tuesday, 9 April 2019

Angels of Friendship - Everything Beautiful has its Moment - Project of the Week


Materials:
A4 White Card 
Design Sheet 
Backing Paper 
Stardust Glitters 
Feathers 
Lace 
Gold Mirror card


Equipment:
Scoreboard 
Bone folder 
Glue or Double Sided Tape 
Quickie Glue Pen 
Scissors 
Paper Trimmer


What You Need to Do:
1) Score and fold the A4 card in half to make an A5 card blank.
2) Cut out a piece of gold card a little smaller than your card base. Then matt and layer your backing paper on top of the card.
Crafting Expression...Matt and Layer means to layer up different papers to give dimensional finish
3) Wrap a large piece of white lace around the centre of your card, then fix to the card as shown using double sided tape or craft glue.
4) Cut out your ribbon strips and fix along the top and bottom of the card, attaching with foam pads or silicone glue. If using silicone glue remember to leave your work to dry for at least an hour.
5) Cut out your chosen topper and attach to the centre of the card.
6) Glitter your Angel using the Stardust glitters and a quickie glue pen.
7) Cut out a sentiment and attach to the top and bottom of the card using foam pads.
8) Finish by making an embellishment using feathers, lace and a topper. Fix to the right hand side of the card as shown using silicone glue.

Tuesday, 2 April 2019

Art Deco - Fold Card - Project of the Week


Materials:
A5 White Card Blank
Backing Papers 
Design Sheet
Glitter
Gems


Equipment:
Scissors
Trimmer
Double sided tape
Foam Pads/Silicone Glue
Score Board
Bone Folder
Quickie Glue Pen


What You Need to Do:
1) Using the A5 card, fold back the top layer to make a fold back card.
2) Cut backing paper to fit the front and inside of the card and attach using double sided tape or glue.
3) Cut out your topper and topper to the left hand side with foam pads, making sure you only fix the topper to one side so it over hangs.
4) Cut out a sentiment and fit to the top left using foam pads.
5) Cut out an extra topper or sentiment and fix to the inside of the card.
6.) Finish off by adding glitter highlights or gems.

Tuesday, 26 February 2019

Art Deco Elegant Moments - Just for You - Project of the Week


Materials:
A4 White Card
Design Sheet/Paper


What You Need to Do:
1) Fold an A4 card in half. Turn it so the spine is at the top. Cover the front of the card with paper. Mark at 4.5cm and 16.5cm. Draw a line down by 8.5cm and cut down the line.
2) Fold the sides back and forward to put in a crease line. Then take the top of the side and fold it to the crease line. Gently push your sides into shape to create a mountain fold, valley fold, mountain fold, valley fold and then mountain fold.
3) Cut out toppers and fix to the front of the card using foam pads.

Tuesday, 29 January 2019

Art Deco Wedding - Front Step Card - Project of the Week

Materials:
2 x White A5 Card Blanks 
Design sheet 
Backing Papers
Flowers from 
Glitter/Gems


Equipment:
Basic Equipment

What You Need to Do:
1) Lay both the cards flat on your surface with the open ends together. Slot inside each other and attach one to the inside front to create a zig zag shape. Then fold the top card in half to create the front step card.
2) Cover the front of the card and the step with backing paper.

3) Cut out and matt and layer using mirror card the main topper, sentiment and ribbon strip.
4) Attach the main topper to the front of the card as shown.
5) Fix the ribbon strip across the front section using double sided tape or glue. Then fix your large sentiment topper to the right hand side of the card
6) Cut out and attach a few embellishments to the back of the card using foam pads as shown.
7) Finish by adding self adhesive gems and glitter highlights.

Wednesday, 23 January 2019

Oriental Promise - Especially for You - Project of the Week


Materials:
White Card Blank
Backing Paper 
Design sheet 
Pearl Drops
Stardust Glitter


Equipment:
Scissors
Trimmer
Double sided tape
Foam Pads/Silicone Glue
Score Board
Bone Folder
Quickie Glue Pen


What You Need to Do:
1) Cut down your card to measure 27cm x 14.5cm. Then score 3.9cm and 12.3cm from the left hand side.This will create your fold back card.
2) Using your backing paper attach to each section of your card blank using double sided tape or craft glue.
3) Cut out your main topper elements and layer up using foam pads or silicone glue.
4) Attach your main topper to the panel of your card using foam pads or silicone glue. If using silicone glue, please leave your work to dry for at least an hour.
5) Attach the extra topper to the right of your card as shown.
6) Choose your sentiment and fix to your card using foam pads and craft glue.
7) Add pearl drops to your card.
8) Finish by adding touches of glitter to your backing paper using a Quickie glue pen.

Shabby Chic Garden - Planting a Garden Clutter Card - Project of the Week


Materials:
1 x White A4 Card
Toppers
Backing Paper 
Distress Ink (Frayed Burlap)


Equipment:
Basic Equipment

What You Need to Do:
1) Score and fold the A4 card in half to make an A5 card blank.
2) Cut out your toppers, sentiments and embellishments. Position them over your card moving them about until you are happy with the arrangement. Swipe distress ink around the edges of the toppers if you feel they do not stand out enough.
3) Once happy start attaching your pieces using tape or glue. Also attach some with foam pads to give extra dimension to the card.
4) Finish by adding a bird the handle of the spade with foam pads.

Thursday, 3 January 2019

Hello Autumn - Happy Birthday - Project of the Week


Materials:
Square Card Blank
Toppers
Backing Paper


Equipment:
Scoreboard
Bone folder
Glue or double sided tape
Quickie Glue Pen 
Scissors
Paper trimmer


What You Need to Do:
1) Using the square card, score from the bottom left hand corner to the top right hand corner, fold and re-enforce using your bone folder. This will create your twisted easel card shape.
2) Print off your backing paper and toppers from your cd. Attaching into place using double sided tape or craft glue.
3) Cut out your extra elements and fix to the front of the card as shown using foam pads.
4) Choose a ribbon strip and fix to the base of the card using double sided tape or craft glue.
5) Cut out a sentiment topper and fix to the card as show. This will act as a stopper and hold your card up. If using silicone glue, leave your card to dry for at least an hour.
6) Add extra elements to your card as you wish using foam pads.

Thursday, 6 December 2018

Autumn Fairies - Lantern - Porject of the Week


Materials
Lantern Sheet
Lantern Toppers
Gems/Embellishments
Glitter


Equipment
Trimmer/craft knife
Scissors
Strong Double sided tape
Score board
Bone folder
Foam pads/silicon glue


What You Need to Do:
1) Cut out the two lantern panels and fix together using double sided tape or glue, but do not make the lantern totally up until all your toppers are fixed in each of the windows.
2) Cut out and glue the lantern toppers into your lantern windows as shown.
3) Cut out the ribbon strips and cross them over as shown to make a lantern holder.
4) Add sentiments with foam pads to give dimension at the bottom of lantern panels.

5) Finish off with glitter highlights and gems.

Thursday, 1 November 2018

Christmas Divas - Christmas Wishes - Project of the Week


Materials:
A4 White Card
Backing Paper
Decoupage Sheet
Gold Mirror Card
Black Card
Glitter/Gems
Black Ribbon


Equipment:
Basic Equipment

What You Need to Do:
1) Cut out and make up the decoupage topper. Make up using foam pads or silicone glue. If using silicone put your work to one side to dry for about an hour.
2) Score and fold an A4 card in half to make an A5 card blank. Measure across the fold to 15cm. Cut down the card at this mark to create a square card blank.
3) Cut a piece of black card slightly smaller than the front of the card. Attach using double sided tape or glue. Cut backing paper slightly smaller again and matt on top.
4) Matt the decoupage topper onto gold mirror card. Cut out following the shape and leaving a small even gap around the edges. Matt onto black card and again cut out leaving a small even gap. Attach to the front of the card centrally.
5) Wrap black ribbon around the left hand side and secure on the inside front. Tie a bow and attach as shown.
6) Cut out a sentiment and attach at an angle as shown with foam pads.
7) Finish with self adhesive gems and ultra fine glitter.

Tuesday, 23 October 2018

Autumn Fairies - There's Magic All Around - Project of the Week

Materials:
A4 White Card
Design Sheet
Backing Paper
Fairy Dust glitters


Equipment:
Scoreboard
Bone folder
Glue or double sided tape
Quickie Glue Pen 
Scissors
Paper trimmer


What You Need to Do:
1) Score and fold the A4 card in half to make an A5 card blank.
2) Cover the front of the card using your chosen backing paper, fixing in place using double sided tape or glue.
3) Cut out a ribbon strip and fix along the top and bottom of the card as shown.
4) Cut out your chosen fairy topper from your design sheet.
5) Glitter your fairy using the Fairy Dust glitters and a quickie glue pen.
6) Fix your topper to the front of the card using double sided tape or glue.

7) Cut out a sentiment and attach to the bottom left hand side with foam pads.
8) Finish by adding self adhesive gems.

Wednesday, 17 October 2018

Christmas Fairies - Best Wishes - Project of the Week


Materials
Decoupage Sheet 
Backing Papers 
DL White Card 
Glitter


Equipment
Paper Trimmer 
Bone folder 
Wet Craft Glue 
Foam Pads 
Quickie Glue Pen


What You Need to Do:
1) Using the DL card cover the front of the card using your chosen backing paper and double sided tape or wet glue. 
2) From your decoupage sheet cut out all your layers and layer up your image using foam pads or silicone glue. If using silicone glue, make sure you leave your work to dry for at least an hour. 
3) Fix your decoupage to the centre of the card using foam pads. 
4) Then add a sentiment to the bottom of the card fixing bottom centre of the card. 
5) To give your fairy that magic touch, using a quickie glue pen add glitter highlights around the details of the wings.