Showing posts with label Project of the week. Show all posts

Wednesday, 28 August 2019

Project of the week: Flamingo Pocket Card


Materials:
6” x 6” White card blank 
Pink Card
Design Sheet and Paper 
Ribbon
Button

Stamp 

Equipment:
Basic Craft Equipment

What You Need to Do:

1. Cut pink card slightly smaller than the card blank and attach with double sided tape or glue.
2. Matt a piece of backing paper on top leaving a small even gap around the edges.
3. Cut out the ribbon strip the same length as the backing paper.  Wrap a piece of ribbon around and secure on the back.  Attach to the left hand side of the card as shown.
4. Cut out and score the tabs on the pocket.  Attach to the right hand side of the card.  Cut out the tag and punch a hole where indicated.  Thread ribbon through.  Stamp a sentiment onto pink card, trim to fit on the bottom of the tag.   Pop the tag into the pocket.
5. Finish with a button.

Tuesday, 20 August 2019

Project of the Week: Flutterby Delights

Materials:
White Card 
Backing Paper 
Design Sheet 
Gems 
Stardust Glitter


Equipment:
Basic Craft Equipment

What You Need to Do:
1. Using your white card, cut it down to 35cm x 13cm. Then fold in half to create your card shape.

2. Cut out your backing paper and fix to the front of your card using double sided tape or craft glue.
3. Cut out a ribbon strip and fix to the left hand side of your card.
4. Cut out your topper and fix to the centre card using foam pads or silicone glue. If using silicone glue leave your work to one side to dry for at least an hour.
5. Cut out a sentiment and fix to the bottom right hand side with foam pads.
6. To finish add touches of glitter and gems to your card.

Thursday, 15 August 2019

Project of the Week: Steam Punk


Materials:
A4 White Card
Paper
Topper
Embellishments


Equipment:
Basic Craft Equipment

What You Need to Do:
1. Using an A4 measure and mark across the long edge at 5cm, 10.1cm and 20.3cm then score down the page at these marks.
2. Push the card into shape and reinforce the score lines with a bone folder.
3. Cover the front sections with backing paper, making sure there is an even gap around the edges. Attach using double side tape or glue
4. Cut out your main topper and attach it to mirror card. Cut out leaving a small even gap around the edges
5. Attach the ribbon strip along the bottom. Make up the dimensional flowers and fix with a strong glue. Cut out the extra sentiments and attach with foam pads.

Monday, 5 August 2019

Christmas Fairies - Merry Christmas - Project of the Week

Materials:
Decoupage Sheet 
Backing Papers 
2 A5 White Card Blanks 
Ribbon Strip 
Glitter
Equipment:
Paper Trimmer 
Bone Folder 
Wet Craft Glue 
Foam Pads 
Quickie Glue Pen
What You Need to Do:
1. Using one of the A5 card blanks, fold back the front of the card. Then rpeat the Using the DL card cover the front of the card using your chosen backing paper and double sided tape or wet glue.
2. From your decoupage sheet cut out all your layers and layer up your image using foam pads or silicone glue. If using silicone glue, make sure you leave your work to dry for at least an hour.
3. Fix your decoupage to the centre of the card using foam pads.
4. Then add a sentiment to the bottom of the card fixing bottom centre of the card.
5. To give your fairy that magic touch, using a quickie glue pen add glitter highlights around the details of the wings. 

Tuesday, 30 July 2019

Project of the Week: Party Penguins Seasons Greetings

Materials:
8 x8 White Square Card Blank 
Backing Paper
Design sheet 
Flowers 
Glitter/Gems 


Equipment:
Scissors 
Trimmer 
Double Sided Tape 
Foam Pads/Silicone Glue 
Score Board 
Bone Folder 
Quickie Glue Pen 


What You Need to Do:
1. Cut down your backing paper so it covers half of the front of the card, as shown. Fixing into place using double sided tape or craft glue.
2. Cut out your chosen topper and fix to the centre of your card using foam pads.
3. Cut sentiments, attach them to the card using foam pads and craft glue as shown.
4. Using your flowers, fix to the left hand side of the bottom of the card using foam pads or silicone glue. If using silicone glue, leave your work to dry for at least an hour.
5. Using a Quickie glue pen, add glitter around your main topper.
6. Finish off by adding self adhesive gems. 

Thursday, 18 July 2019

Santa Claus - Side Scene Card


Materials:
White A4 Card 
Side Scene Card Sheets 
Embellishments


Equipment:
Scissors
Trimmer
Double sided tape
Foam Pads/Silicone Glue
Score Board
Bone Folder
Blending Tool
Quickie Glue Pen


What You Need to Do:
1) Print out all the elements from the collection. If your printer takes card, print directly onto card. If you can not print onto card, print onto paper and back onto card.
2) Cut out your main card base (see diagram 1 on the sheet). Cut on the solid lines and score on the broken. Fold into shape to create a fold back card.
3) Cut out the long tab (see diagram 2 on the sheet), then score the lines and fold. Then fix it to the bottom of the left hand side of the card and then to the bottom of the right hand side. (see diagram on the sheet, where it is shown in green).
4) Then fold into shape.
5) Cut out panels 3 and 4 from your design sheets. Then fold back the tabs. Attach them to the middle section of the main card in height order using double sided tape or glue.

Summer Days - Have an Amazing Day


Materials:
A5 Card Blank
Design Sheet
Backing Papers
Distress Inks
Lace 
Silk Flowers
Ribbon


Equipment:
Basic Craft Equipment

What You Need to Do:
1) Print off your chosen backing paper and topper
2) Tear your paper slightly smaller than the front of the card blank. With your finger gently roll some of the edges to give it a more distress look. Attach to the front of the card with tape or craft glue.
3)Use distress inks in coordinating colours and blend around the edges of the card.
4) Cut a length of lace slightly longer than the width of the card. Run one of the distress inks across to colour the card slightly gathering it as shown.
5) Tear around your chosen topper and blend distress inks around the edges as before. Attach to the card front with foam pads at a slight angle.
6) Cut out some small sentiments from the craft sheet. Tie a piece of ribbon around one and fix to the top of the card with foam pads.
7) Make up a small bouquet of silk flowers and tie with a ribbon. Attach to the bottom of the card to finish.

Thursday, 2 May 2019

Oriental Promise - Koi Surprise - Project of the Week


Materials:
A4 White Card
Design Sheet 
Backing Paper 
Black card
Gold card
Green Ribbon
Pearl Drops
Stardust glitter


Equipment:
Trimmer/craft knife
Scissors
Score board
Bone folder
Double sided tape
Foam pads/silicone glue


What You Need to Do:
1) Cut down your card to measure 21cm x 21cm.Then fold in half to create your card shape.
2) Cover your card by matt and layering your backing paper with gold and black card as shown. Attaching into place using double sided tape or craft glue. Leave a 3mm white edge as.
3) Wrap a piece of ribbon around the mounted backing paper and fix to the card.
4) Cut out your topper and attach to the centre with foam pads or silicone glue. If using silicone glue, leave your work to dry for at least an hour.
5) Fix pearl drops to the four corners.
6) Finish by glitter highlights to your card using a quickie glue pen.

Monday, 29 April 2019

Pocket Full of Memories - Explore a Dream - Project of the Week


Materials:
A4 White Card 
Backing Papers 
Design Sheet 
Glitter/Gems 
Ribbon


Equipment:
Basic Craft Equipment

What You Need to Do:
1) Score and fold an A4 card in half to make an A5 card blank. Rotate the card so the spine is along the top. Using your free cds print out all your elements.
2) Cut out your backing paper and fix with double sided tape or glue to the front of your card.
3) Cut out your topper and attach to the left hand side of the card using foam pads.
4) Cut out your sentiment topper and attach to the right hand side of the card using glue and foam pads.
5) Then cut out your ribbon strip and fix along the bottom edge of your card, attaching with double sided tape or glue.
6) To finish add some glitter highlights using a quickie glue pen.

Tuesday, 9 April 2019

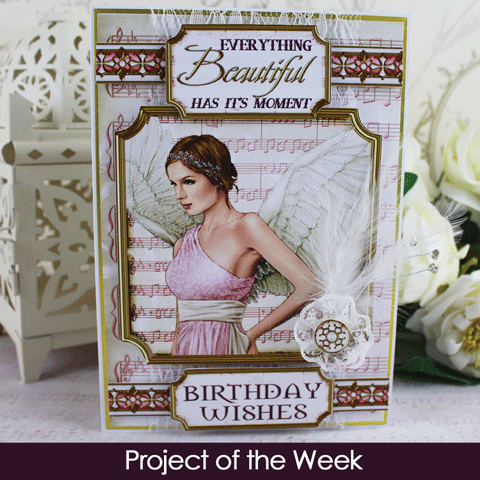
Angels of Friendship - Everything Beautiful has its Moment - Project of the Week


Materials:
A4 White Card 
Design Sheet 
Backing Paper 
Stardust Glitters 
Feathers 
Lace 
Gold Mirror card


Equipment:
Scoreboard 
Bone folder 
Glue or Double Sided Tape 
Quickie Glue Pen 
Scissors 
Paper Trimmer


What You Need to Do:
1) Score and fold the A4 card in half to make an A5 card blank.
2) Cut out a piece of gold card a little smaller than your card base. Then matt and layer your backing paper on top of the card.
Crafting Expression...Matt and Layer means to layer up different papers to give dimensional finish
3) Wrap a large piece of white lace around the centre of your card, then fix to the card as shown using double sided tape or craft glue.
4) Cut out your ribbon strips and fix along the top and bottom of the card, attaching with foam pads or silicone glue. If using silicone glue remember to leave your work to dry for at least an hour.
5) Cut out your chosen topper and attach to the centre of the card.
6) Glitter your Angel using the Stardust glitters and a quickie glue pen.
7) Cut out a sentiment and attach to the top and bottom of the card using foam pads.
8) Finish by making an embellishment using feathers, lace and a topper. Fix to the right hand side of the card as shown using silicone glue.

Thursday, 21 March 2019

Mermaid Dreams - Swim With Passion


Materials:

Square white Card Blank
Design Sheet 
Backing Paper 
Stardust Glitter
Red ribbon
Buttons


Equipment:

Scoreboard
Bone folder
Glue or double sided tape
Quickie Glue Pen 
Scissors
Paper trimmer


What You Need to Do:

1) Using the square card, score from the bottom left hand corner to the top right-hand corner, fold and reinforce using your bone folder. This will create your twisted easel card shape.
2) Cut out your backing paper and cover the sections of your card as shown.
3) Fix a piece of ribbon along the side of the card as shown.

4) Cut your topper and fix to the front below the score line using double sided tape or craft glue.
5) Fix a button or embellishment to your card base using foam pads/silicone glue. This will act as a stopper and hold your card up. If using silicone glue, leave your card to dry for at least an hour.
6) Choose a sentiment and fix to the topper using foam pads.
7) Finish by adding glitter highlights using a quickie glue pen.

Monday, 18 March 2019

Journey to Wonderland - Sorry It's Late - Project of the Week


Materials:
8" x 8" white card
Topper Sheet
Backing Paper
Sentiment


Equipment:
Trimmer/ Craft Knife
Scissors
Double Sided Tape/Craft Glue
Sticky pads/Silicone glue


What You Need to Do:
1) Cut out your backing paper and attach to the card front using double sided tape or craft glue.
2) Cut out the ribbon strip from the topper sheet and attach diagonally across the top and bottom corner of the card as shown.
3) Cut out your topper and attach centrally to the card front using foam pads or silicone glue (if using silicone glue you now need to put your project to one side before continuing, to allow it to dry)
4) Attach the two sentiments - one in the top left corner and one in the bottom right corner. Because the topper is raised with foam pads the outside edge of the sentiment need to have a foam pad under it but the inside edge (over the topper) only needs glue or double sided tape) to keep it flat with the topper.
5) Finally the card can be decorated with glitter or gems as you want to.

Monday, 4 March 2019

The Flower Patch - Enjoy Every Minute of your Retirement - Project of the Week


Materials:
Square card blank
Design sheet 
Backing Paper 
Contrasting Backing Paper
Stardust Glitter


Equipment:
Scissors
Trimmer
Double sided tape
Foam Pads/Silicone Glue
Score Board
Bone Folder
Quickie Glue Pen


What You Need to Do:
1) Cover the front of your base card with your chosen backing paper. Fix into place using double sided tape or craft glue.
2) Using a contrasting backing paper, cut out a section to look like a ribbon strip.
3) Cut out your main topper and fix at an angle using foam pads or silicone glue. If using silicone glue leave to dry for an hour.
4) Cut out extra embellishments and fix them around the card as shown using foam pads or silicone glue.
5) Cut out a sentiment and fix to the middle of the card.
6) Finish the card by adding touches of glitter using a quickie glue pen to your toppers.

Tuesday, 26 February 2019

Monochrome Owls - Flying by to Say Congratulations - Project of the Week


Materials:
1 A4 white Card 
Design sheet 
Backing paper

Equipment:
Trimmer/Craft Knife
Scissors 
Double Sided Tape 
Score Board 
Bone Folder 
Foam Pads/Silicon Glue

What You Need to Do:
1) Print off your Design sheet and backing papers. 

2) Using the A4 card, fold over the left hand side by a third. 

3) Cover all areas with backing paper. 

4) Cut out your chosen topper and fix to the front fold, ensuring you only put adhesive on one side. 

5) Cut out extra embellishments and toppers and fix to the inside of the card with foam pads. 

6) To finish add some flower embellishments to the front of the card as shown.

Art Deco Elegant Moments - Just for You - Project of the Week


Materials:
A4 White Card
Design Sheet/Paper


What You Need to Do:
1) Fold an A4 card in half. Turn it so the spine is at the top. Cover the front of the card with paper. Mark at 4.5cm and 16.5cm. Draw a line down by 8.5cm and cut down the line.
2) Fold the sides back and forward to put in a crease line. Then take the top of the side and fold it to the crease line. Gently push your sides into shape to create a mountain fold, valley fold, mountain fold, valley fold and then mountain fold.
3) Cut out toppers and fix to the front of the card using foam pads.

Tuesday, 29 January 2019

Art Deco Wedding - Front Step Card - Project of the Week

Materials:
2 x White A5 Card Blanks 
Design sheet 
Backing Papers
Flowers from 
Glitter/Gems


Equipment:
Basic Equipment

What You Need to Do:
1) Lay both the cards flat on your surface with the open ends together. Slot inside each other and attach one to the inside front to create a zig zag shape. Then fold the top card in half to create the front step card.
2) Cover the front of the card and the step with backing paper.

3) Cut out and matt and layer using mirror card the main topper, sentiment and ribbon strip.
4) Attach the main topper to the front of the card as shown.
5) Fix the ribbon strip across the front section using double sided tape or glue. Then fix your large sentiment topper to the right hand side of the card
6) Cut out and attach a few embellishments to the back of the card using foam pads as shown.
7) Finish by adding self adhesive gems and glitter highlights.