Showing posts with label Christmas. Show all posts

Monday, 5 August 2019

Christmas Fairies - Merry Christmas - Project of the Week

Materials:
Decoupage Sheet 
Backing Papers 
2 A5 White Card Blanks 
Ribbon Strip 
Glitter
Equipment:
Paper Trimmer 
Bone Folder 
Wet Craft Glue 
Foam Pads 
Quickie Glue Pen
What You Need to Do:
1. Using one of the A5 card blanks, fold back the front of the card. Then rpeat the Using the DL card cover the front of the card using your chosen backing paper and double sided tape or wet glue.
2. From your decoupage sheet cut out all your layers and layer up your image using foam pads or silicone glue. If using silicone glue, make sure you leave your work to dry for at least an hour.
3. Fix your decoupage to the centre of the card using foam pads.
4. Then add a sentiment to the bottom of the card fixing bottom centre of the card.
5. To give your fairy that magic touch, using a quickie glue pen add glitter highlights around the details of the wings. 

Tuesday, 30 July 2019

Project of the Week: Party Penguins Seasons Greetings

Materials:
8 x8 White Square Card Blank 
Backing Paper
Design sheet 
Flowers 
Glitter/Gems 


Equipment:
Scissors 
Trimmer 
Double Sided Tape 
Foam Pads/Silicone Glue 
Score Board 
Bone Folder 
Quickie Glue Pen 


What You Need to Do:
1. Cut down your backing paper so it covers half of the front of the card, as shown. Fixing into place using double sided tape or craft glue.
2. Cut out your chosen topper and fix to the centre of your card using foam pads.
3. Cut sentiments, attach them to the card using foam pads and craft glue as shown.
4. Using your flowers, fix to the left hand side of the bottom of the card using foam pads or silicone glue. If using silicone glue, leave your work to dry for at least an hour.
5. Using a Quickie glue pen, add glitter around your main topper.
6. Finish off by adding self adhesive gems. 

Thursday, 18 July 2019

Santa Claus - Side Scene Card


Materials:
White A4 Card 
Side Scene Card Sheets 
Embellishments


Equipment:
Scissors
Trimmer
Double sided tape
Foam Pads/Silicone Glue
Score Board
Bone Folder
Blending Tool
Quickie Glue Pen


What You Need to Do:
1) Print out all the elements from the collection. If your printer takes card, print directly onto card. If you can not print onto card, print onto paper and back onto card.
2) Cut out your main card base (see diagram 1 on the sheet). Cut on the solid lines and score on the broken. Fold into shape to create a fold back card.
3) Cut out the long tab (see diagram 2 on the sheet), then score the lines and fold. Then fix it to the bottom of the left hand side of the card and then to the bottom of the right hand side. (see diagram on the sheet, where it is shown in green).
4) Then fold into shape.
5) Cut out panels 3 and 4 from your design sheets. Then fold back the tabs. Attach them to the middle section of the main card in height order using double sided tape or glue.

Tuesday, 25 June 2019

Art Deco Decadent Christmas - Feather Glamour


Materials:
A4 White 
Card Topper 
Backing Papers 
White Feathers


Equipment:
Scoreboard 
Bone Folder 
Glue or Double Sided Tape 
Quickie Glue Pen 
Scissors 
Paper trimmer


What You Need to Do:
1) Cut down you card to 18.5cm x 29.7cm, then fold in half to create your card blank. Mark and score at 8cm and 11.5cm. Using a bone folder fold back the first score line and then forward the second score line. This will create your card shape. 
2) Cover the front and the inside back with backing paper using double sided tape or glue. 
3) Cut out the ribbon strip and fix to the right hand side as shown. 
4) Cut out your topper and sentiment, and back it with card to make it sturdier. 
5) Attach white feathers to the back of the topper, then fix the topper onto the front panel, using silicone glue, (make sure you leave your work to dry for at least an hour). 
6) Attach the sentiment on top of the topper using foam pads, allowing it to overhang as shown. 
7) Finish off adding glitter highlights and gems to the card.

Tuesday, 4 December 2018

Santa Claus - Joy to World - Project of the Week


Materials
2 x White Square Card Blanks 
Design sheet 
Backing Papers 
Embellishment 
Stardust Glitter/Gems


Equipment
Basic Equipment

What You Need to Do:
1) Lay both the cards flat on your surface with the open ends together. Slot inside each other and attach one to the inside front to create a zig zag shape. Trim a half from the top card, then fold in half to create the front step card as shown. 

2) Cover the back and each step with backing paper using double sided tape or craft glue

3) Cut out your main topper and fix to the centre of the card using foam pads or silicone glue. If using silicone glue, leave your work to dry for at least an hour.
4) Cut out a ribbon strip and fix to the bottom of the front step using double sided tape or craft glue.
5) Choose 2 sentiments and a topper. Fix to the front steps with foam pads as shown.

Tuesday, 27 November 2018

Vintage Heaven Christmas - Merry Christmas - Project of the Week


Materials
Square card blank
Design sheet 
Backing Paper
Embellishment Sheet
Stardust Glitter
Buttons

Equipment
Trimmer/ Craft Knife
Scissors
Double Sided Tape
Sticky pads/Silicone
Score Board
Bone Folder

What You Need to Do:
1) Cover the front of the card base with your backing paper, attaching into place using double sided tape or craft glue.

2) Cut our your topper and layer up your decoupage elements using foam pads or silicone glue. If using silicone glue leave your work to one side to dry for at least an hour.

3) Attach your main topper to the card as shown. Fixing into place using double sided tape or craft glue.
4) Cut out your sentiment topper and layer up your elements. Attach to the top left hand side of the card.
5) To give more dimension fix buttons on the tree as shown.
6) Finish the card by adding touches of glitter using a quickie glue.

Wednesday, 7 November 2018

Santa Claus - To a Special Friend at Christmas - Project of the Week


Materials:
A4 White Card
Backing Paper
Die Cuts
Template
Design Sheet
Gems & Glitter


What You Need to Do:
1) Transfer all your markings from the template to card cutting on the solid lines and scoring on the broken. Gently push your card should fold into shape.
2) Cover the card with your chosen backing papers using double sided tape or glue.
3) Cut out the ribbon strip from the backing paper and fix to the card using double sided tape or glue.
4) Using your free die cuts, pop out your chosen topper and attach to the card front with foam pads.
5) Cut out your flowers and layer them up using foam pads or silicone glue. (don�t forget if you are using silicone glue to leave your work to one side for at least an hour to dry).
6) Pop out some of the smaller die cuts and fix them to your card using foam pads.

7) To finish add glitter using a quickie glue pen.

Wednesday, 17 October 2018

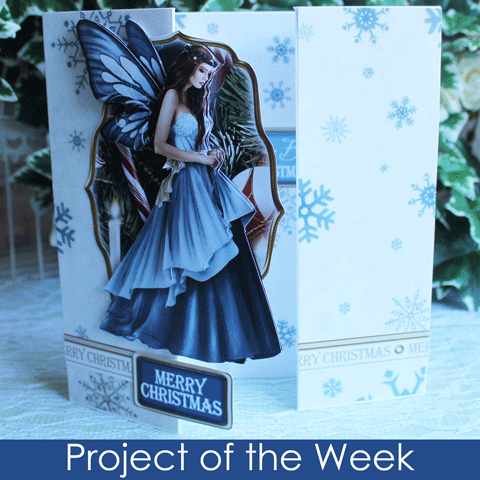
Christmas Fairies - Best Wishes - Project of the Week


Materials
Decoupage Sheet 
Backing Papers 
DL White Card 
Glitter


Equipment
Paper Trimmer 
Bone folder 
Wet Craft Glue 
Foam Pads 
Quickie Glue Pen


What You Need to Do:
1) Using the DL card cover the front of the card using your chosen backing paper and double sided tape or wet glue. 
2) From your decoupage sheet cut out all your layers and layer up your image using foam pads or silicone glue. If using silicone glue, make sure you leave your work to dry for at least an hour. 
3) Fix your decoupage to the centre of the card using foam pads. 
4) Then add a sentiment to the bottom of the card fixing bottom centre of the card. 
5) To give your fairy that magic touch, using a quickie glue pen add glitter highlights around the details of the wings.

Thursday, 20 September 2018

Magic of Christmas - With Love - Project of the Week


Materials:
A4 White Card 
Design Sheet 
Glitter 
Gems Embellishment


Equipment:
Scissors 
Trimmer 
Double sided tape
Foam Pads/Silicone Glue 
Score Board 
Bone Folder 
Blending Tool 
Quickie Glue Pen


What You Need to Do:

TOP TIP: Instead of using a knife and ruler, why not use Fiskars paper trimmer to get that precision cut.
1) Using your A4 card fold in half and trim down to make a square card.
2) Cut out all your elements for your large decoupage topper. Decoupage the scene using silicone glue or foam pads. If using silicone glue leave to dry for at least an hour.
3) Cut out a sentiment and attach to the front with foam pads.
4) Then cut out a piece of holly and attach to the sentiment as shown. 5 Finish by adding glitter highlights using a quickie glue pen.

Friday, 14 September 2018

Art Deco - Merry Little Christmas - Project of the Week


Materials:
A4 White Card 
Backing Papers 
Design Sheet
Glitter/Gems
Equipment:
Scissors 
Trimmer 
Double Sided Tape 
Foam Pads/Silicone Glue 
Score Board 
Bone Folder 
Quickie Glue Pen
What You Need to Do:
1) Using the A4 card, fold it in half, along the spine, measure 9.5cm along then cut down 6.5cm down.To make a stepper card fold the step section over to make a crease line, then fold it back.To finish push the step inside. 
2) Cover the card with backing paper attaching with double sided tape or craft glue. 
3)Cut out your decoupage topper and layer up all your elements using foam pads or silicone glue.Fix to the side step as shown.If using silicone put your work to one side to dry for at least an hour. 4) Cut out your ribbon strip and extra toppers and fix to the card as shown using double sided and craft glue. 
5) Choose a sentiment topper and fix to the step using foam pads. 
6) Using a Quickie Glue pen add ultra fine glitter add glitter highlights to the image. 
7) Finish by adding self adhesive gems
.


Friday, 24 August 2018

Party Penguins - Holiday Cheer - Project of the Week


Materials:
  • Square card 
  • Free design sheet / papers 
  • White ribbon / string
  • Sand coloured card 
  • Buttons
Equipment:
  • Trimmer / Craft Knife
  • Scissors 
  • Double Sided Tape
  • Sticky Pads
  • Bone Folder
What You Need to Do:

Top Tip: To give a cluttered effect, you need to stick to 2-3 colourways and just keep adding layers and textures.
  1. Using the backing paper, cover the front of the card using glue or double sided tape. 
  2. Tear corners from a contrasting paper and fix as shown on opposite ends. 
  3. Using the wide white ribbon, wrap a piece around the card ash shown. 
  4. To give a more textured effect, tie a few knots in the string and then wrap it on top of the white ribbon. 
  5. Matt and Layer your main topper with sand card and contrasting paper as shown. 
  6. Then fix to the centre of the card using foam pads. 
  7. Cut out your extra embellishments/sentiments and fix to the card as shown using foam pads. 
  8. Finish the card by adding buttons to the bottom right hand side of the card, attaching with wet glue.

Thursday, 7 December 2017

Project of the week: Rudolph Front Step Card


Merry Christmas

Materials
A4 white Card 
8 x 8 square blank card

Christmas
1. Using the A4 card trim down a rectangle to measure 29cm x 19cm.  Then score from the left side at 4.8cm and 9.5cm.This will create your front step.  Attach this to your square card to create your shape.

2. Cover the card with your chosen paper.

3. Use a contrasting paper for the front step.

4. Cut out a paper ribbon strip and fix one strip to the top of the card and one strip to the front step.

5. Cut out your main topper and fix to the card as shown.

6. Cut out a large sentiment and fix to the bottom panel of the card at an angle to give more definition.

7. Cut out a smaller coordinating sentiment and attach to the top of the card with double sided tape letting the sentiment overhang as shown.

Tuesday, 5 December 2017

MDF Decorations

MDF is suitable for crafters of all skill levels, its fun to work with and will create fantastic decorations! 
This MDF Woodland Kit includes an mdf tree scene and mdf forest scene, designed to work in conjunction with the Vintage Chic Chalk Finish Paint and of course some Stardust Glitters for a magical Christmas Sparkle!

Friday, 1 December 2017

Project of the week: Winter Woodland


Winter woodland Stepper Card

Materials
2 x White Square Card Blanks
Design sheet/Paper
Green Ribbon
Glitter/Gems

1. Lay both the cards flat on your surface with the open ends together. Slot inside each other and attach one to the inside front to create
a zig zag shape. Then trim down the front layer to measure only 10cm. Then fold in half to create the front step card as shown.

2. Cut down your backing paper a few mil smaller than your card and cover the back of the card with backing paper using double sided tape or glue.
3. Cut down your backing paper for the front step and attach using double sided tape or wet glue.
4. Cut out your main topper and fix to the back of the card using foam pads. Layer up your decoupage using foam pads or silicone glue.
5. Cut out your a little topper and fix to the front step as shown.
6. Then cut out sentiment and fix to the right of the card using foam pads.
7. Finish by adding self adhesive gems and glitter highlights.

Thursday, 30 November 2017

THREADS No-sew Fabric Christmas Gifts & Home Decor


In 2015 Texlon introduced THREADS cotton and silk inkjet printable fabrics for the crafts market
enabling avid crafters to personalise a whole range of items for the home, to wear or for other projects.

THREADS has recently joined forces with Debbi Moore Designs to bring you an inspirational USB key featuring video instructions and printable elements to create a variety of fabulous fabric
Christmas gifts and home décor. The possibilities are endless with these innovative inkjet fabrics
and you will not even need a sewing machine to recreate the fun projects featured in the USB key!

Wednesday, 15 November 2017

Project of the week: Snowboarding Snowman

Snowboarding Snowman

Materials
White 8” x 8” Card Blank
Die Cut Snowflakes
Piece of Acetate
Glitter & Gems

1. Print off all the elements.

2. Cover the front of your card with your chosen backing paper.

3. Cut out a ribbon strip and attach it to your card along the left hand side.

4. Cut out your topper and attach it to your card towards the top as shown, using foam pads.

5. Cut a piece of acetate 1.5cm x 8cm and attach it to the inside front of your card. Using your bone folder crease it so that it hangs over the front. Attach a die cut snowflake using double sided tape to the end.

6. Attach another snowflake to the bottom left of the topper using double sided
tape and another overlapping with foam pads.

7. Attach a sentiment to the bottom right hand corner with foam pads.

8. Add subtle highlights to the backing paper and snow using a quickie glue pen and glitter.

9. Finish off with gems

Wednesday, 8 November 2017

Project of the week: 12 Days of Christmas


Materials

Partridge In a Pear Tree

1. Print all your elements from the cd. 

2. Cover the front of your card with backing paper.

3. Fix your two ribbon strips to either side of your card.

4. Cut out your elements from your design sheet. Back with mirror card to give extra support. Fix to the card with foam pads to give dimension.

5. Add gems and glitter highlights to finish.